Sunday, March 29, 2009

SM Santa Rosa for Earth Hour --WEIRD

News about Earth Hour have been circulating the trimedia and the cyberweb for quite sometime. Being an advocate for our planet's well-being, I'm one of those people who got excited to witness such event. Sadly though, because of stress and tons of errands to run for my graduation, I completely forgot about this. I went to my school today to have my photo taken for, yes, my graduation. I've been going in and out of the city for more than a week now. I'm staying in Santa Rosa, Laguna for the week. 'Good thing that I turned on the idiot box when i got home and tuned into national geographic channel and got reminded of the Earth Hour.


I immediately texted my friends to remind them to switch off their lights at exactly 8:30PM. A couple of them replied and told me to go to SM Santa Rosa because our local mall, SM, here in Santa Rosa will participate in the event and will conduct a programme for this.


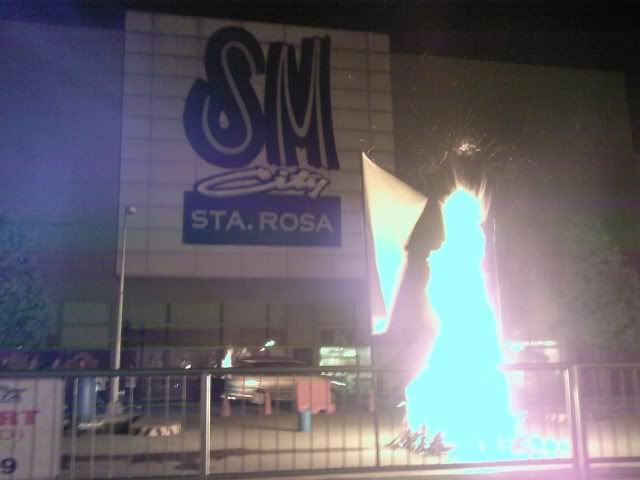
So I dressed up and went to the said mall. Ok, there were performances of dancers and singers and to my surprise, there was a bonfire. YES, a bonfire.... during Earth Hour.


Isn't Earth Hour about fighting global warming? and what is the cause of global warming? and a bonfire? WTF?


Photobucket

Click here to view full entry...

Thursday, March 19, 2009

Dimitri Posters

'Did a quick layout of posters for DIMITRI here are the artworks...


Photobucket

Photobucket

Click here to view full entry...

Friday, March 13, 2009

Old Photographs

Since I'm sorta new here in blogger, i'd like to post some of the photos I took these past few years when I was still studying / freelancing.

shoot for john paras

shoot for John Paras


shoot for john paras

shoot for John Paras


for CSRLI

shoot for my highschool alma mater


children photog

children photography


for thesis

shoot for my college thesis


john herrera

John Herrera


lemme know whatchathink. =) thanks

Click here to view full entry...

Sunday, March 8, 2009

For John


Photobucket


My peace offering. Thank God were ok na.


=============
here is John's original photo.


I learned how to achieve this effect through this tutorial but I tweaked it up a bit by removing some of the hard edges and softening it using the healing brush tool
Click here to view full entry...

Photography Icons Photoshop Brush Set


Photobucket


Download

I created this set of brushes from some vectors I created in Adobe Illustrator. Just wanna share it with you guys. Have fun using this free photoshop brush =)
Click here to view full entry...

Friday, March 6, 2009

Old Sketches

I've been going through a lot lately. Or maybe I'm just overstressed. I tried organizing my HDD and found my old drawings. Did these from 2002 to 2004-ish. I just wanna share it with you guys.


Photobucket

Photobucket

Photobucket

Photobucket
Click here to view full entry...

Wednesday, March 4, 2009

Dimitri's Label

I designed the label of a local clothing brand, Dimitri.


Photobucket
Click here to view full entry...

Monday, March 2, 2009

Photoshop and Painter Tutorial: The Impressionism Effect

This tutorial will teach you how to edit your photo to give it that roughly painted / impressionism effect I did in my previous post.

In this tutorial, I would like you to experiment and play around later on in photoshop. I'm just gonna teach you the technique on how to achieve that "painted" look without actually painting the subject in corel painter or photoshop.


before and after

Photobucket


you will be needing:
-a tablet
-know-how in Corel Painter and Adobe Photoshop
-Corel Painter (I'm using Painter X)
-Adobe Photoshop
-a keen eye for details

==================================

Open the jpeg file in corel painter.

I'm gonna use my friend, Lotho's pic in this tutorial. Lotho, BTW, is a very talented, fab and one of the most sought after stylists here in Manila. Checkout his blog in ISKANDALOSA

The resolution of the photo is 1250 x 1563 pixels.

Photobucket


The background of the photo is plain and I wanted to put in some colors. use the brush tool and select oil and then fine camel brush. In this photo, I'm gonna use the shades of red, orange and yellow.

Photobucket

Photobucket

Photobucket


now... paint...

Photobucket

Photobucket

Photobucket


Its now time to blend the colors and distort the whole picture...
Using the brush tool, select blenders and then "just add water."
Use a brush size that you think would be great in distorting the photo.

Photobucket

Photobucket


Distort the photo using this brush...

Photobucket

Photobucket


Create atleast three versions of this distorted photo. In the other versions I created, I used blues and greens in the background.

Photobucket

Photobucket

Photobucket


now open the three photos you distorted in photoshop

Photobucket


drag the photos into one PSD file

Photobucket


The keyword is "PLAY!"
The trick now here is layering and masking: play around with the settings of each layer ( multiply, linear burn, difference, overlay, soft light, screen, etc etc) and mask out those part of the photo which you think needs masking.

Photobucket

Photobucket


Flatten the PSD file and adjust levels, hue, saturation etc etc. if needed. 

This is my final artwork:

Photobucket

If you have any questions, pls leave a comment and I would gladly answer it for you. =)

Click here to view full entry...